Friday 2 March 2012

Creating a Leader Board for TFS

In a previous job I used Hudson and Jenkins Open Source build servers. One of the previous developers had implemented a Leader Board Report.  This was a bit of fun that tracked each developers points based on a number of criteria, some of which are described below:

  • When a developer checked in code that did not break the build they got 10 points, and lost 10 if they broke it.
  • Adding a unit test to a sucessful build got an additional point.
I got to wondering whether I could implement such a report in TFS 2010. It occurred to me that i may be possible to do something with the TFS data warehouse. The Analysis Services version of the data warehouse was discounted as it does not store information at the level of the person who checked in the build.

However, the sql server warehouse does. This is called tfs_warehouse and has a number of useful fact and dimension tables.

This is a good reference from Microsoft for the relational version of the data warehouse.

My approach to creating this report was as follows:
  1. Create query(s) and or view(s) that will produce the leaderboard as a result set. For simplicity I am sticking to the two criteria described above.
  2. Create an SSRS report based on the query created in 1.
  3. Publish this report so it is accessible from TFS project dashboards.
To get the base information to determine success and failure of builds by person I created this query:
SELECT dper.Name
,det.BuildSK BuildSK
,CASE BuildStatusSK WHEN 3 THEN 1 ELSE NULL END Succeeded
,CASE BuildStatusSK WHEN 2 THEN 1 WHEN 1 THEN 1 ELSE NULL END Failed

FROM dbo.factbuildchangeset chg
INNER JOIN dbo.factbuilddetails det ON det.buildsk = chg.buildsk
INNER JOIN dbo.DimChangeset dchg ON dchg.ChangesetSK = chg.ChangesetSK
INNER JOIN dbo.DimPerson dper ON dper.PersonSK = dchg.checkedinbysk INNER JOIN dbo.dimbuild dbuild on det.buildsk = dbuild.buildsk

WHERE BuildType = 'Individual Continuous Integration'

This joins a number of tables together so that it can be determined who checked-in each changeset and what the result of this checkin was. I use a CASE statement to convert a build status value into a Succeeded or Failed field that can then be summed to support the scoring for the leader board. The WHERE clause ensures that we only score check-ins done a part of the continuous build process as we are only interested as builds that run as the result of a check-in, otherwise people could gain points just by re-running the same successful build again and again.

To get the number of unit tests added I created a couple of views directly in the TFS warehouse but I added them to my own schema called custom:

1. This creates a list by ascending build of the number of unit tests present in that build.

CREATE VIEW [custom].[vwTestRunsByProjectAndBuild] AS
SELECT
tr.TeamProjectSK

,tr.BuildSK,COUNT(tr.BuildSK) testcount,
ROW_NUMBER() OVER (ORDER BY tr.TeamProjectSK, tr.BuildSK) ordinal
from facttestresult tr
GROUP BY tr.TeamProjectSK, tr.BuildSK


2. To find the number of tests added/taken-way per build and with Sql Server lacking lag and lead type functions, this does a self join of the previous view using the ordinal value.

CREATE VIEW [custom].[vwTestsAddedByProjectAndBuild] AS
WITH T2  AS
(
 select * from custom.vwTestRunsByProjectAndBuild
)
select  T1.TeamProjectSK, T1.BuildSK BuildSK,
TestsAdded = CASE WHEN IsNull(T1.testcount- T2.testcount, T1.TestCount) > 0 THEN IsNull(T1.testcount- T2.testcount, T1.TestCount)
ELSE 0 END,
T1.TestCount T1TestCount,
T2.TestCount T2TestCount
FROM
(
 SELECT * FROM custom.vwTestRunsByProjectAndBuild
) T1
LEFT JOIN T2 ON T1.ordinal - 1 = T2.ordinal


3 Putting these together gives this query which generates the list that will be used in the final report.

SELECT x.ProgrammerName, SUM(x.POINTS) "Points"
FROM
(
SELECT fact.Name ProgrammerName,
COUNT(fact.Succeeded) * 10 - Count(fact.Failed) * 10 
+ CASE COUNT(fact.Failed) WHEN 0 THEN
(
SELECT SUM(TestsAdded) FROM custom.vwTestsAddedByProjectAndBuild vta
WHERE vta.BuildSK = fact.BuildSK
)
 ELSE 0 END
AS "Points"
FROM
(
 SELECT dper.Name,
 det.BuildSK BuildSK,
 CASE BuildStatusSK WHEN 3 THEN 1 ELSE NULL END Succeeded,
 CASE BuildStatusSK WHEN 2 THEN 1 WHEN 1 THEN 1 ELSE NULL END Failed
 FROM factbuildchangeset chg
 INNER JOIN factbuilddetails det  ON det.buildsk = chg.buildsk
 INNER JOIN dbo.DimChangeset dchg ON dchg.ChangesetSK = chg.ChangesetSK
 INNER JOIN dbo.DimPerson dper ON dper.PersonSK = dchg.checkedinbysk
 INNER JOIN dbo.dimbuild dbuild on det.buildsk = dbuild.buildsk
 WHERE BuildType = 'Individual Continuous Integration'
) fact
GROUP BY fact.Name, fact.BuildSK
) x
GROUP BY x.ProgrammerName
ORDER by "Points" DESC


I then created a report using BI Studio 2008 as follows (note a zip file containing this project can be found here)


Once this report is up and running the final thing is to publish it to the TFS Reporting Services site. On my machine this is at http://dell/ReportServer_TFS. I've added it to the following folder TFSReports/DefaultCollection/SilverTurtle/Builds. This is in the Builds folder of the project I am working on in my Default Collection.

In actual fact it probably should go at a higher level as it is a leader board of all developers working on that particular TFS server. I imagine it would be relatively easy to constrain the data to report by project or collection if required.

I imagine there are a number of metrics that could be used for the report. Unit tests added is probably not the best metric to use, for example if you delete all the tests and put them back you get a stack load of points. For a future enhancement I am considering code coverage which is tracked in the Warehouse model. If you improve the code coverage you get points if you decrease it you lose points.

On my setup my report looks like this, there are only a few users set-up on my local system but it illustrates the principle:


Monday 27 February 2012

Different Versions of Team Found Server

I originally installed Team Foundation Server 2010 from my MSDN disk on Windows 7 Ultimate 64 bit. When I came to do some work on the datawarehouse I discovered it hadn't been installed.

It took me a while to work out that there are two completely separate installs of TFS. One for Client (which is without Sharepoint, Reporting and both the Sql Server and Analysis Services TFS Data Warehouses) and one for Server (Windows 2008 R2 in my case) . This later version allows all components of TFS to be installed.
Administration Console on Windows 7
Administration Console on Windows Server 2008 R2

The bottom line is you want the Data Warehousing, Reporting and Sharepoint portal features of TFS you must install it on a server version of windows. There is no way to get these features on the client version.

Tuesday 31 January 2012

Integrate DotCover into Team Foundation Server

When looking into setting up builds in Team Foundation Server 2010 it is possible to integrate Jetbrains DotCover tool into the build process. This article explains how. The article assumes usage of TFS 2010, Visual Studio 2010 Professional Edition or greater and Dotcover 1.2. Further it assumes that you already have configured a build server and build agent, see here for details.

All the files/projects required for this are located in a zip file here and at GITHUB https://github.com/dunnmike602/TFSDotCover

I'd be very interested in any comments on the post below, including any problems setting this sort of thing up in different environments.

Step 1: Create a New Build Process Template

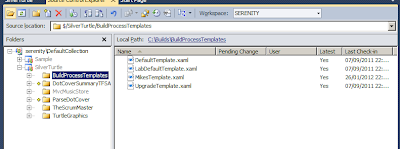
The TFS 2010 build process is controlled by a Windows Workflow Foundation Xaml file called DefaultTemplate.xaml. It is located in a sub-directory called BuildProcessTemplates for each project created within a project collection. These templates can be viewed within the Source Control Explorer as below:


To create a new one simply copy the DefaultTemplate.xaml to a new name on the file system. In this case I have created a copy called MikesTemplate.xaml. This is the one we will use to modify to add the DotCover processing steps.

Step 2: Add the DotCover Steps to the template

Open the new template in Visual Studio 2010. It will open up in the Windows Workflow graphical designer. The overall workflow process looks as follows:


Even if youre not familiar with WWF then its relatively easy to navigate round. Double clicking on a task drills down through the hierarchical workflow to show the sub-tasks. I found the correct place to place my changes by trial and error.

Step 2a: Add required variables to workflow

In the Workflow designer clicking on the Run On Agent workflow step and then clicking on the Variables tab shows all variables in scope for this step. A new variable called DotCoverPercent has been added to accept the results of the code coverage step.


Step 2b: Add required arguments to workflow

Arguments allow information to be passed when queuing up a build to control various aspects of this build. I have added a new set of arguments to control the DotCover processing in the build as shown in the screenshot below:


The arguments have the following purposes:
  • DotCoverEnabled - switch on and off code coverage.
  • DotCoverFailurePercent - if code-coverage overall is less than this value it will fail the build.
  • DotCoverLoadDll -  dll that contains the code that will form a load for DotCover. Usually this will be a set of Unit Tests.
  • DotCoverLoadRunnerPath - path to the executable that will run the load that will be covered. I am using MSTest which on my machine is C:\Program Files (x86)\Microsoft Visual Studio 10.0\Common7\IDE\mstest.exe.
  • DotCoverPath - path to the DotCover console application. On my machine this is C:\Program Files (x86)\JetBrains\dotCover\v1.2\Bin\dotcover.exe. This allows coverage to be run from a command line.
These parameters are placed in the same category by editing the metadata argument visible in the Arguments tab as shown below:


Step 2c: Add required workflow steps

This was the most fiddly part of the process and required a lot of trial and error, especially as I am no Windows Workflow expert.

To find the correct place to put the new steps in the main part of the designer I drilled down to the following place:

Process > Sequence > Run On Agent > Try, Compile Test And Associate Changesets And WorkItems > Try Compile And Test > Compile And Test >For Each Configuration in BuildSettings.PlatformConfigurations > Compile and Test for Configuration.

In this Sequence activity, I added an If activity that will only start off code coverage if the relevant flag is set:


The activity circled above is itself a Sequence of steps as shown below:

The command line runner is used with the -cover option to create a binary file of coverage statistics. It is further used to create Html and Xml versions of the coverage report.  The Xml version is parsed by a Custom Activity (the source code for which is included in the zip file in the ParseDotCover project). This extracts the the overall coverage and uses it in a subsequent step to work out whether or not to fail the build. The HTML version will be linked to by the build summary report. It is an interactive web page that allows viewing of all the coverage data down to the source code level.

NOTE that the ParseDotCover project should be compiled and placed in the .NET 4 GAC with the following command line:

gacutil /i ParseDotCover.dll
All the coverage reports are generated in the Binaries directory so they will be automatically copied to the configured drop directory for each build.

Once these changes were made the new template was checked in to the BuildProcessTemplates directory for the project I am building.

Step 3: Create a new build with the new template.

In VS 2010 Team explorer, right click on the Builds directory and select New Build:


  1. In the General tab choose a name for the build.
  2. In the Trigger tab choose the method of triggering a build. For example I wanted Continuous Integration.
  3. In the Workspace tab choose the Source Control location.
  4. In the Process Tab pick the new template from the drop-down that appears. Fill in the values for 4. DotCover Code Coverage. Set DotCoverEnabled to True, set DotCoverFailurePercent to the value you require for your projects. The other values need to be set based on your local environment and how you want to generate a load for the coverage. I've also set Logging Verbosity to Diagnostic so you can see detailed information in the build trace log.
Save the build definition when you are finishedRun the build from Team Explorer by right clicking the new build definition and selecting Queue New Build.

If the build runs successfully you will see something like below in the build log.


Step 4: Modify the Build Summary Report.

The final step is to modify the build summary report to include a section for DotCover which looks like below:


All this shows at the moment is simply a hyperlink to the HTML code coverage report that was created as part of the build.

The build summary report is actually a feature of VS2010 not the build template. It is done by creating a VS 2010 add-in. I learned how to do this from this very useful article here.

The add-in I created is in the Zip file in the DotCoverSummaryTFSAddin. This adds a new section to the above report by creating a new Factory class based on the interface IBuildDetailFactory. The summary report is actually coded in Xaml hence the need to create objects from System.Windows.Documents. The code in CreateNodes creates the hyperlink to the Html report. It traps the Navigate event and launches it in a new browser window.